Subtitling with Linux Tutorial
Subtitling a film is a process involving many steps all of which can be done using open-source software running on Linux. This how-to guide is an attempt to explain the entire process. It assumes that you have a running Linux system, commandline experience, some video savvy, and know how to install new programs.
Any comments or corrects are appreciated; send me an email: rob@wordnerd.de
Table of Contents
Digitizing
You should always put your subtitles on the version of your film with the best quality. Often this copy will be on some sort of external storage media, such as a DVD or VHS or DV cassette. In order to add subtitles to this version, you first need to get it on your computer. You can skip to the next section if your film is already on your computer.
If you have a Super8, 16mm or 35mm film, you'll have to get in touch with a film laboratory that can make a digital copy of your film. Using professional broadcasting equipment, you can get material like Digital Betacam running on Linux; however, you'll need to invest a fortune. Contact a specialist if you need this.
DVD
If the DVD is copy protected, you have to install libdvdread and libdvdcss in order to read it on Linux.
Whether copy-protected or not, the DVD can be easily brought back to your hard disk, for example with MPlayer. I have MPlayer SVN-r31918 installed. First find out the track number of the video you want to subtitle.
mplayer dvd://1
Replace 1 with 2, 3, etc. to find your film. Dump that track to your hard disk using:
mplayer dvd://1 -dumpstream -dumpfile title1.vob
If your DVD contains pre-existing subtitles and multiple audio streams, you will have to take these into account, if you want to create a DVD later on and when creating a compatible file.
HDV, DVCPRO, DV Untested
dvgrab can be used to capture video from HDV, DVCPRO, DVCAM and DV sources over firewire. dvgrab runs on a shell and doesn't have a GUI; whereby, Kino's capture module can be used as a front end for DVCPRO, DVCAM and DV formats. Kdenlive can be used for HDV, but be careful not all cameras are compatible.
VHS Untested
You'll need an analog TV tuner card. For this example, video was plugged into the card over a composite cable and the audio into the sound card. There are a variety of programs to record with. I used Mencoder, which belongs to the MPlayer package:
mencoder tv:// \
-tv driver=v4l2:width=720:height=480:norm=ntsc:input=1:device=/dev/video0:immediatemode=0 \
-ovc lavc -lavcopts vcodec=mjpeg:aspect=4/3 -aspect 4:3 -noautoexpand -oac pcm -o video.avi
- tv://
- tell mencoder to input from the TV tuner
- driver
- different tv cards might require different drivers
- width
- can be changed to 704 for ntsc
- height
- has to be changed to 576 for pal
- norm
- has to be changed to pal for pal
- input
- change for the input type: 0 = tv, 1 = composite, 2 = SVHS
- -ovc lavc
- the video encoder
- -lavcopts
- video encoder options separated by colons
- vcodec=mjpeg
- video codec
- aspect=4/3
- always 4:3 for VHS as far as I know
- -oac pcm
- lossless audio encoding
This records in the mjpeg file format which is very good. It takes up a lot of space though, a little less than 5 GB per hour of video. The best news is that its patents have expired.
Subtitling software
There many programs to make subtitles with for Linux. The most important things are to be able to preview how your subtitles will look on the video and to listen to the dialog. Subtitleeditor is the most advanced program in this respect and the one used throughout this text, but Aegisub and Gnome-subtitle and Jumbler are also pretty up-to-date.
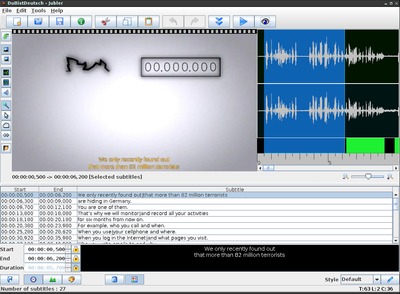
Jumbler
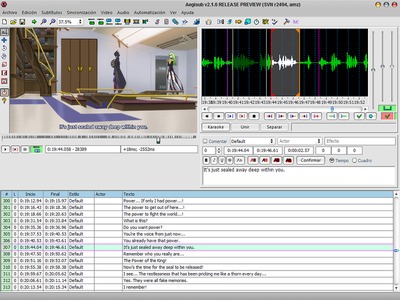
Aegisub
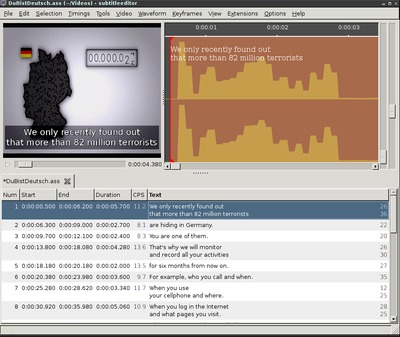
Subtitleeditor
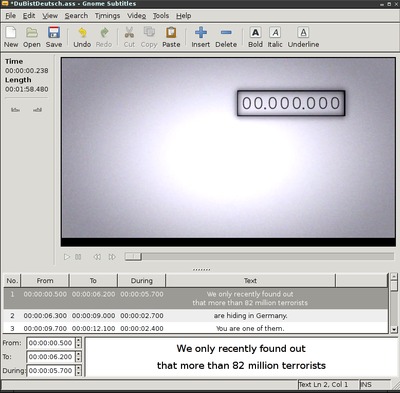
Gnome Subtitle
Installing Subtitleeditor
Ubuntu & Debian
The version of Subtitleeditor used here is 0.37.1; whereby, 0.38 is already out and can be install in Ubuntu as described below. A lot of new features are used in these instructions, so it is important that the newest version is installed.
With Ubuntu, it's as easy as:
apt-get install subtitleeditor
Unfortunately the Subtitleeditor version that is currently bundled for Debian is out of date because of dependency conflicts. For Debian Squeeze, you can install the following deb packages.
For Debian Squeeze i386
wget http://ppa.launchpad.net/nilarimogard/webupd8/ubuntu/pool/main/s/subtitleeditor/libsubtitleeditor0_0.37.1-1~webupd8~karmic_i386.deb
wget http://ppa.launchpad.net/nilarimogard/webupd8/ubuntu/pool/main/s/subtitleeditor/subtitleeditor_0.37.1-1~webupd8~karmic_i386.deb
sudo dpkg -i libsubtitleeditor0_0.37.1-1~webupd8~karmic_i386.deb
sudo dpkg -i subtitleeditor_0.37.1-1~webupd8~karmic_i386.deb
For Debian Squeeze AMD
wget http://ppa.launchpad.net/nilarimogard/webupd8/ubuntu/pool/main/s/subtitleeditor/libsubtitleeditor0_0.37.1-1~webupd8~karmic_amd64.deb
wget http://ppa.launchpad.net/nilarimogard/webupd8/ubuntu/pool/main/s/subtitleeditor/subtitleeditor_0.37.1-1~webupd8~karmic_amd64.deb
sudo dpkg -i libsubtitleeditor0_0.37.1-1~webupd8~karmic_amd64.deb
sudo dpkg -i subtitleeditor_0.37.1-1~webupd8~karmic_amd64.deb
Installing Subtitleeditor from source
If your Linux distribution doesn't offer a way to install the newest Subtitleeditor version, you will have to install from source.
I recently did this on Ubuntu and I had to add the following programs to get it configured:
intltool, libtool, automake, libglib2.0-dev, libgtkmm-2.4-dev, libglibmm-2.4-dev, libenchant-dev, libxml++2.6-dev, libgstreamer-plugins-base0.10-dev, libgstreamer0.10-dev, libgstreamermm-0.10-dev
Getting started
Video, waveform and keyframes
Subtitleeditor is so useful because it allows you to quickly decide where and when a subtitle should be set. It does so with a combination of a film, which can be used to sample the timing of each subtitle and hear what is being said; a waveform, which allows you to see where someone is talking; and keyframes, which allow you to see where a cut is. Unfortunately, getting all three features up in running isn't always easy.
Generating a waveform
Create a waveform of you audio. This will help you see precisely where someone begins to talk and marks where the subtitles are on a timeline.
WAVEFORM > Open Waveform From File
Select your film here. This will both open your film and generate your
waveform. You'll be asked to save your waveform, do so with the
suggested name. Unless you are working with a Subtitleeditor project
file, every time you restart subtitleeditor you'll have to reopen this
file (Waveform > Open Waveform From File) as well as your video
(Video > Open).
If your film comes from a DVD, you might be dealing with multiple
audio tracks. You can select the proper track under Video > Audio track.
If you have problems with the video, audio, timecode or waveform, then the next section explains how to transcode your film into a compatible format.
Generating keyframes
Next we grab the video keyframes. This will hopefully create blue lines on your waveform, with which you can recognize scene changes.
KEYFRAMES > Generate keyframes from video
You'll be asked to save your keyframes, do so with the suggested name.
Unless you are working with a Subtitleeditor project file, you'll have
to reopen this file every time you restart subtitleeditor with
Keyframe > Open Keyframes.
Generating keyframes will not work at all for some video formats, for others it might result in keyframes at regular intervals, which is hardly useful. Also, the worse the quality of the video, the harder it is for Subtitleeditor to recognize the scene changes.
If this does not work and your video's quality isn't abysmal, you can try transcoding the video into a suitable format as described in the next section. If transcoding hasn't helped, you can remove the useless keyframes with:
KEYFRAMES > Close the keyframes
It's not the end of the world if you have to make subtitles without keyframes.
Creating a compatible film
This section is rather long but important: If your film isn't running properly in subtitleeditor, then you won't be able to take advantage of its most import features.
We'll use both a GUI and the commandline to try to make compatible films. While both methods work well, the GUI method is easier for beginners and I have had more luck getting scene change recognition to work. Using the commandline you will be more likely to get odd formats encoded properly.
GUI method
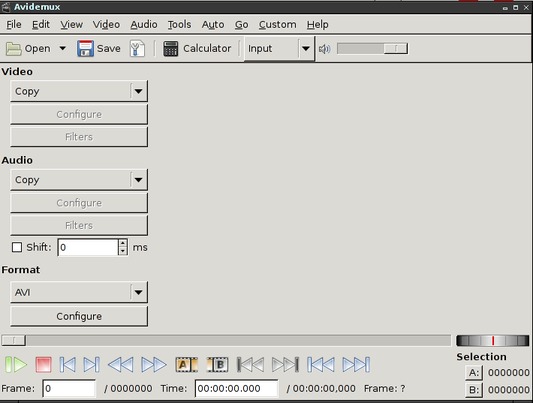
We'll use Avidemux.
In Ubuntu and Debian installation is simple with
apt-get install avidemux
Libx264 will be doing the encoding here and it's important to have a very recent version, which the latest Debian and Ubuntu versions supply.
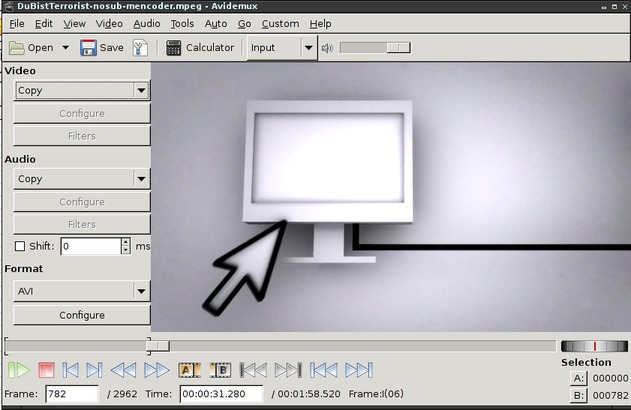
First open Avidemux and click Open to select your video.
If your source was a DVD and you have multiple audio track, you will
be prompted to pick the proper track: Audio > Main track
If your video is a long one and you want to test whether it will be
transcoded properly, move the slider below the video to a point
after a few scene changes have taken place. Click the Selection: end
button, which looks like a B on film.
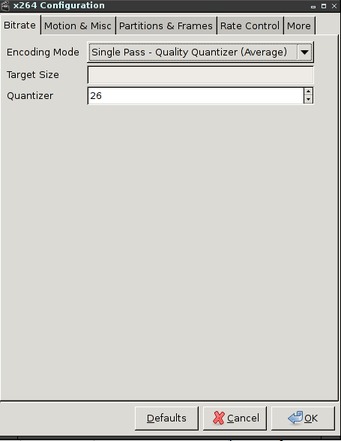
Now select the MPEG-4 AVC in the Video drop-down menu on the
right-hand side. Hit Configure directly beneath.
In the Bitrate tab of the newly opened window, you might want to
lower the Quantizer to 20. This is a trial and error setting;
it is responsible for the quality of the file. The lower number the
higher the quality. This is a reason why you should transcode only a
portion of the video at first to see what it looks like.
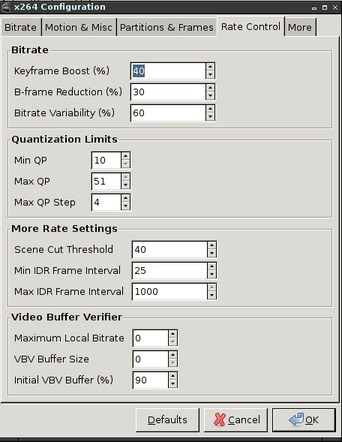
Next move over to the Rate Control tab. Here you'll set Scene Cut Threshold to 100. Once again a trial and error measure. Lower it if
you discover that too many keyframes are being created. Change the
Min IDR Frame Interval to 25, so that a keyframe isn't created more
than once per second, which will be our minimum subtitle
length. Change Max IDR Frame Interval to 1000 to make sure that
keyframes won't be created when there aren't any scene changes. Click
OK to save the settings.
If your audio was being played by Subtitleeditor, you can probably
leave Copy under Audio on the left hand side of the main Avidemux
window. However, this could lead to problems if your audio codec isn't
compatible with the container format. If you are doing a test run on a
portion of the video, just leave Copy and see if Subtitleeditor
plays the audio. If it doesn't or the audio never worked, select MP3 (Lame) in the drop down menu under Audio. Lame will have to be
installed.
Hit Save at the top left of the main window. In the pop-up window,
give your file a name with an avi ending (e.g., test.avi) and hit the
Save button. Your file will be transcoded. Once you're done, open
your file as described in the Video, waveform and keyframes section. If all went well, and you decided to transcode the entire
file in one foul swoop, you're good to go.
If all went well, and you only transcoded a portion of the file as a
test, go back to Avidemux and move the slider under the video to the
end of the film and hit the Selection: end button (b on
film). Resave the film now, transcoding could take a while --
i.e. hours.
If lots of keyframes are being produced where there are no scene
changes, try lowering the Scene Cut Threshold setting. If the
quality of the transcoded video is really bad, decrease the
Quantizer setting.
If your film still isn't playing, the waveform isn't being created or scene changes aren't being detected: Proceed to the next section.
Commandline method
If the above didn't work or if you feel more at home on the commandline, the following is for you.
- Mencoder and x264
We'll also use x264 (at least libx264-98) with MPlayer (aka Mencoder).
mencoder input.avi -ovc x264 -x264encopts bitrate=1000:keyint=750:scenecut=100 \
-of avi -oac mp3lame -lameopts vbr=3 -o mencoder.avi
- -ovc x264
- Encodes the video with the x264 codec
- -x264encopts
- colon separated options for the video encoder
- bitrate
- You can make the bitrate higher or lower. Higher if you have a fast processor and/or your original is of high quality, lower if you have a slow computer and/or your original has a bad quality.
- keyint
- Creates a keyframe automatically every 750 frames as long as there aren't any scene changes. That's once every 30 seconds.
- scenecut
- This is the maximum setting for scene change detection. Decrease it (minimum is 0 or -1 to shut off detection) if you are getting too many keyframes where there shouldn't be any.
- -of avi
- Output container format
- -oac mp3lame
- audio encoder
- -lameopts
- audio encoder options separated by colons
- vbr=3
- selects variable bitrate method
- -o
- Output file
You might also want to add the
-endpos 60option at first to test the scene change detection for the first minute. Load the finished video into subtitleeditor. If everything checks out, encode leaving out that option.For DVD films with multiple audio streams, you'll first have to find out which track you need. To find your audio stream, play the video in mplayer in verbose mode.
mplayer -v title1.vob
Look for the lines that start with "==> Found audio stream:" in the output. Now try the various audio streams listed there to find out which one contains the language you require.
mplayer title1.vob -aid 128
Add
-aid 128to the above Mencoder command to select this audio stream for transcoding.
- FFMpeg
You can also fall back on ffmpeg to make an mpeg4, if x264 isn't working for you.
ffmpeg -i source_de_HD.mov -vcodec mpeg4 -g 1500 -ab 96k -b 1000k ffmpeg.avi
- -g 1500
- creates a keyframe automatically every minute
- -vcodec mpeg4
- the video will be encoded using mpeg4
- -i
- your original movie
- ffmpeg.avi
- output file
- -ab 96k
- Audio quality bits/second. The default bitrate is rather low.
- -b 1000k
- Video quality in bits/second. The default is also rather low. Increase if you're not satisfied with the video quality.
You might also want to add the
-t 120option as in mplayer to test whether the scene changes are being caught and if the quality is up to par.If your film can't be transcoded with any of these methods, you are in trouble and will be unlikely to get the subtitles onto the film later on. If your film is not getting transcoding either your film file is broken, there is a bug for your format, or your format is proprietary or so new that it isn't supported under Linux yet.
Shortcuts
Options > Configure Keyboard Shortcuts
is where you set your shortcuts.
Here are some of my shortcuts settings (bear in mind I use an American keyboard)
- <<Medium - Ctrl-D
- <<Short - Ctrl-F
- <<Very short - Ctrl-G
- Play/Pause - Ctrl-H
- >>Very short - Ctrl-J
- >>Short - Ctrl-K
- >>Medium - Ctrl-L
- Play selection - Ctrl-P
- Snap start to previous keyframe - Ctrl-N
- Snap start to next keyframe - Ctrl-M
- Snap end to previous keyframe - Ctrl-,
- Snap end to next keyframe - Ctrl-.
- -100 msec from Start - Ctrl-7
- +100 msec to Start - Ctrl-8
- -100 msec from End - Ctrl-9
- +100 msec to End - Ctrl-0
- -100 msec from Start and End - Ctrl-Alt-7
- +100 msec to Start and End - Ctrl-Alt-0
- Zoom in waveform - Ctrl--
- Zoom out waveform - Ctrl-_
- Center with selected subtitle - Ctrl-1
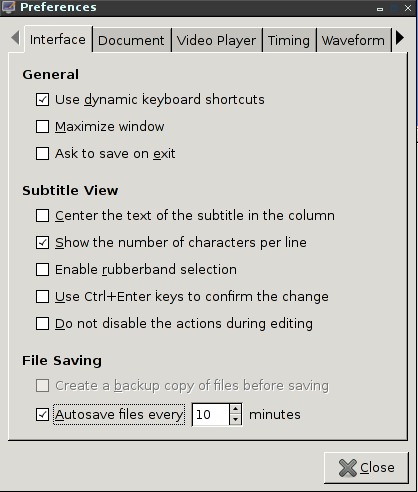
Settings
A variety of settings can be customized in the Preferences window
Options > Preferences
Preset timing
Various timing options can be customized, for example presets for subtitle durations.
Options > Preferences > Timing
Here you can change the field for
Minimum display of subtitles
to 10000 msecs, so that every inserted subtitle will automatically be 10 seconds long, which is useful while transcribing. You'll have to set this back to something like 1000 msecs while spotting, otherwise subtitles can't be less than 10 seconds long.
Playback while typing
You may want to control playback while you are typing.
This is done under
Options > Preferences > Interfaces
by checking
Do not disable the actions during editing
If you do this, you will also have to change keyboard shortcuts which only involve one letter, for example D for Dialogue.
Auto-save
Auto-saving files isn't a bad idea in case of a crash.
Go to
Options > Preferences > File Saving
and check
Autosave file every 10 minutes
External Player
You can might want to watch the film on an external player while editing to get a feel of the overall context and whether your subtitle fit. MPlayer is used for this purpose. This way you can also see the subtitles overlaid over the original version of the film if it wasn't compatible with Subtitleeditor. This is also the best way to catch typos.
Opening your film
Your subtitle has to be saved in the SRT, ASS or another compatible format for MPlayer (although ASS isn't explicitly mentioned, it is also compatible). Mplayer can't use files saved in the Subtitleeditor project format.
Open your original file:
Extensions > External Video Player > Open Movie
With Spacebar + CTRL you can start the movie. The subtitle file you have open will be superimposed over the film.
Player preferences
If you want to watch ASS subtitles or SRT subtitles with italics, you'll have to change the preferences:
Extensions > External Video Player > Preferences
You'll have to add -ass to the Command field. It should look like this:
mplayer "#video_file" -noautosub -sub "#subtitle_file" -ss #seconds -osdlevel 2 -ass
Beware though, you'll have change your config file to get line breaks shown properly for ASS.
Subtitle formats
Before you start your project, you have to decide in which subtitle format you want to work. If you change your mind later, you can easily convert between format. Subtitleeditor can read and write a variety of formats. Here's a description of my favorites.
Subtitleeditor project
This format will save pretty much all of the settings for your subtitles including styles. It will also automatically opens your video, waveform and – starting in version 0.38 – for keyframes. Most importantly, if you transcribe the text or importing a script, this is the one format that saves both the source and translated texts. If you want to check your subtitles using a external video player, you'll have to save into another format. You'll also have to save to another format when encoding the subtitles.
Use File > New to start your project, File > Save > Save Project to
save as a Subtitleeditor project.
Subrip
Use the Subrip (SRT) if you don't need any special effects in your subtitles – like different colors or supertitles. It is by far the most compatible format when it comes to encoding.
Use File > New to open your file File > Save and save it.
Use the following settings:
Format: Subrip
Character coding: Unicode (UTF8)
NewLine: Unix
If you want to convert subtitles you've already worked on into the SRT format use
File > Save as
Advanced Substation Alpha
Advanced SubStation Alpha (ASS) allows you to create different styles for each subtitles, with which you can specify color, position, bold, variable fonts, etc. Beware that you won't be able to keep these effects if you want to softcode your subtitles on a DVD, for example.
Use File > New to open your file File > Save and save it.
Use the following settings:
Format: Advanced Sub Station Alpha
Character coding: Unicode (UTF8)
NewLine: Unix
If you want to convert subtitles you've already worked on into the ASS format use
File > Save as
ASS playback on MPlayer
You'll have to tinker around a bit to get the line breaks working properly while using a external video player and for encoding.
In the subtitleeditor config file
(~/.config/subtitleeditor/default/config) under the point
[AdvancedSubStationAlpha] you must set line-break-policy to hard in
order to get line breaks working for MPlayer.
Editing
Text
Adding/Deleting a subtitle
With the "Ins" key you can insert a subtitle. Hit enter in the Text or Translation column to start editing it. Ctrl-Del deletes a subtitle.
Line break
With Ctrl-Enter you can add a line break. Do this often as soon as your text fills half the screen width while transcribing. That will help during translation.
Spellcheck
Right click > Languages in the Text or Translation columns to set up
the correct language for auto-correct feature.
You can also spellcheck using Tools > Spell check. Remember you have
to have the appropriate dictionary installed for your language --
aspell, ispell, etc.
Italics
Italics are added using the html syntax:
<i>This will be italicized</i> and this not.
You can also highlight the subtitle you want italicized and hit Ctrl-I.
If you are using ASS format and styles, you'll have to create a style for italics and choose Italic and Fonts.
Timing
Snapping to keyframes
Subtitle durations
You can add or remove 100 msec to the start and/or end of your
subtitle or shift your subtitle back or forth 100 msec using the
options under Timings > Add 100 Milliseconds / Remove 100 Milliseconds.
You can also use the right and left mouse button on the waveform window to mark the beginning and end of the selected subtitle.
Playing subtitles
Under the Video menu there is an array of options for playing your
video – most importantly Play Selection. By using this in
combination with Timings > Add 100 Milliseconds / Remove 100 Milliseconds you can fine tune the position of the subtitle you have
currently selected.
Styles
In order to work with different styles for individual subtitles you'll
need to create various styles and choose one for each subtitle. Styles
can only be used with ASS or Subtitleeditor project files. You also
have to work in Advanced view in order use them.
Change to View > Advanced
In order to create your styles go to Tools > Style Editor
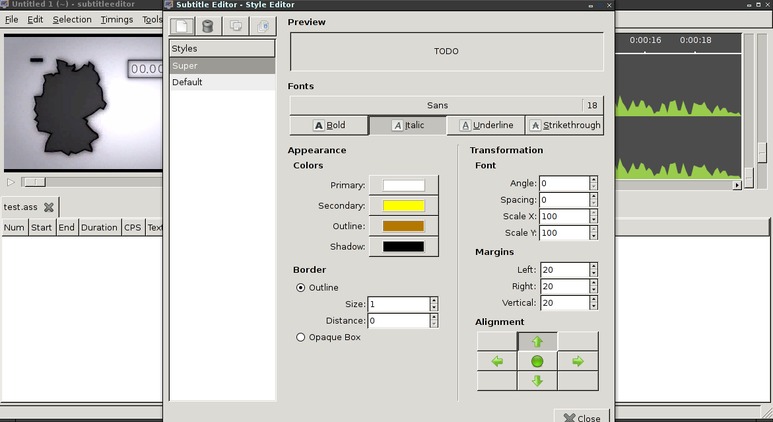
Lets create a style for supertitles – subtitles which appear at the
top of the screen – as an example. Create a new style by clicking on
the blank page at the top left. Click on "Undefined" and rename it
"Super", for example. Under Alignment click the upwards pointing
arrow to position the supertitle at the top of the screen. It's also
best to create an outline for the subtitles as this isn't
default. Check Outline and adjust the Size field to 1. Click on
Italic, so that the supertitle will automatically be italicized.
You should also create a style called "Default". Create a new style
and click on it to rename it "Default" as described above, but using
the default settings offered by subtitleeditor. Check Outline and
adjust the Size field to 1 here as well.
Close the window and select a style for your titles in the Style
column.
Transcribing & scripts
If you already have a text of the film, you can simply import it after formating. If you don't, you can go through the movie once transcribing what it said. This is not necessary, but will likely save you time in the long run.
Scripts
If you have a film script you can import it.
Simply save the file in tat format, then
File > Import > Import Plain Text
It will create a subtitle for each unbroken line in your file. You might have to do a lot of reformatting.
Transcribing
In this step you have to go through the film and write down the films text. It is not necessary, but might make translating easier.
Open your video, waveform and keyframes as described in the section above. It's best you save your file.
The simple view suffices for transcribing
View > Simple

Whereby you can remove the "Translation" column for now
View > View Manager
highlight "Simple", click "Preference" and uncheck "Translation"
You might want to transcribe the texts in blocks as long as the shots, since you will have to fit your subtitles within the cuts later anyways. If you have usable keyframes at cuts then you can easily do this. See snapping to keyframes.
This can however be cumbersome and it might make sense to just transcribe in 10 or 20 second blocks. But be sure to add line breaks regularly, otherwise will have to scroll through the text during translation.
Transcribing is similar to creating subtitling, see the editing section for more details.
What to transcribe?
One import thing to note is that you shouldn't waste time of unintelligible content. If it can't be understood in the source language, then it may be an effect the director of the film was going for. Leave it out.
- Spoken word
Should be added whether on screen or off. If more than one person is talking at the same time, try to write everything down. Later on in translation and spotting you can decide what is important. If you're making subtitles for the hearing impaired, it might be important to add the names of the characters that are speaking in parenthesis. This is especially important for things said off-screen. If you are going to give different colored subtitles to different characters, you can already assign styles to different speakers.
Crowd noise and the like which bears no importance to the story may be left out – although sometimes it can add to the ambiance.
- Text
Any text visible on the screen such as signs, content of letters should be transcribed if it is important to the plot. Once again, you can shorten it later on while spotting or translating. You can already assign a style to such text or italicize it during transcription to differentiate between spoken word.
- Songs
This is sometimes very difficult. A matter of taste, if you like. If the lyrics are import to the plot, then I would transcribe it. You can always leave it out later, though. If it's unintelligible or superfluous, then it's best to leave it out.
Translating
First, change the view so that you can see the translation column
View > Translation
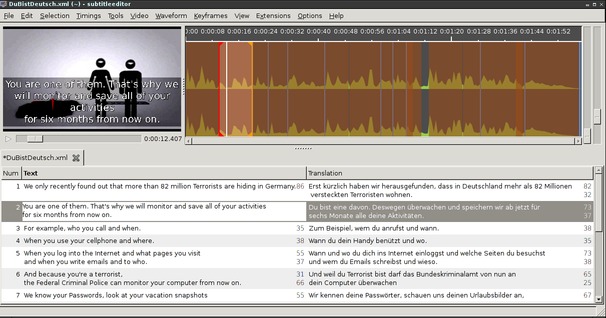
Now translate the text block. Brevity is of the essence, but spotting – where you make sure that the subtitles are shown in readable portions – will come later. You don't have to watch the video now, although it might help you get the gist of what is being said.
Don't forget to change the language to your target.
Translating is also similar to create subtitling, see the editing section for more details. If haven't transcribed the text, you might want to look at the What to transcribe? section for an idea of what's worth translating.
Saving translations
Project
Only the Subtitleeditor project format will save the source and target texts in one file.
After you're finished with translating go to
Tools > Reverse Text and Translation
Other formats
If you use another format, then you have to save the translation to a separate file:
File > Save > Save Translation
Save it as a SRT or ASS file. This time you will have to add a suffix such as .ass or .srt to your filename.
Don't forget to save the translation and your source file before closing Subtitleeditor.
If you've closed subtitleeditor and have restarted it to continue a translation, reopen your source file:
File > Open > Open
and reopen your translation file:
File > Open > Open Translation
When you're done translating, close your subtitle file (be sure to save both translation and source file beforehand):
File > Close
and reopen your translated file as a subtitle file:
File > Open > Open
Spotting
Spotting involves placing and setting the duration of the subtitles. You might also find yourself editing the translated text to make it shorter or more readable.
Spotting rules
There are many different opinions on how to "spot" subtitles, here's my take:
Subtitles…
- must be two lines or less
- must have less than 36 characters including spaces per line
- must be at least one second long and at most seven seconds long
- may not overlap
If possible,
- only use 8 to 14 characters per second
- at least 75ms should be left between subtitles
- don't let subtitles go over cuts
The golden rule is to edit out what doesn't fit and isn't important to the dialogue.
Spotting with Subtitleeditor
First change your view:
View > Timing
The CPS (characters per second) column shows you how many characters
are shown per second in each subtitle. Keep an eye on this to make
sure you're not putting more text in a subtitle than can be read (8-14
CPS).
At the end of the text column there is a number. This is how many characters including spaces there are in a line. Check this to make sure your line will fit in the screen (about 35 or less).
Go through the subtitles, splitting them into two lines if necessary. If there is too much text in one subtitle (2 lines of max. 35 characters), put the text into multiple subtitles by adding a subtitle and copy & pasting the text. Move subtitles so that they do not overlap cuts. Lengthen and shorten subtitles so that they are at least 1 second long and no more than 8 seconds long, but don't forget to keep an eye on the CPS and characters per line.
Subtitling style
Subtitling is an art, so – next to the rules – there are some aesthetic elements which you must decide on.
Here's how I do it. Other subtitlers will do it differently:
- The top line should be shorter than the bottom line so as not to interfere with the picture.
- Keep sentences together on one line and if not in one subtitle. If you must cut a sentence into two lines, cut it at a logical place -- i.e. try not to separate adjectives from nouns, etc. If a sentence is too long for one subtitle use an ellipsis "…" at the end of the subtitle and another one "…" at the beginning of the next subtitle to show that a sentence continues.
- When possible, give each actor their own subtitle for their text. If because of timing issues you must fit the dialog of two actors into one subtitle, give each actor their own line for their text. Also, use a dash and space "- " ahead of each actors text to show that two people are talking.
- If someone interrupts themselves in mid sentence, use an ellipsis "…".
- Use italics to denote titles, captions and any text which may appear on screen and is important to the plot (e.g. signs).
Subtitling written word
- Titles, signs, letters, etc.
If one of the above is shown in the source language, without any speech going on at the same time, you can subtitle it normally at the bottom of the screen. You'll want to use italics to differentiate from spoken word. If there is speech proceed as with caption.
- Caption
Captions at the bottom of the screen in the source language can cause problems. Ideally the filmmakers would ask you to translate the captions and would then make a new version of the film with captions in the target language.
As subtitling the caption gets messy (two texts over one another), you can use the ASS format and a style to make a supertitle for the caption at the top of the screen. You should use italics here as well.
Things get really complicated if someone is talking while a caption is shown. The viewer will mostly likely not be able to read both at the same time. In this case you have to decide if the caption or the spoken word is more important, or if both can be sufficiently abridged.
If you choose to "subtitle" the spoken word you will still have to use supertitles as described above, so that the caption isn't covered.
If you can't use ASS, then try to abridge the subtitles to only one line. Later on, you can try to adjust the subtitle position to make sure they aren't in the way.
Final check
Once you have spotted the subtitles preview them with your original file using the external player.
Encoding subtitles
You can either "hardcode" or "softcode" your subtitles. Hardcoding involve overlaying your subtitles over your video: They cannot be removed and are always visible. Softcoding involves putting the subtitles on an extra stream, so that they can be turned on or off and completely removed. Your subtitles must be in a format other than the Subtitleeditor project format for both methods.
You don't have to read this entire chapter, just pick out the format you want to use from the next section and skip ahead the instructions.
Format overview
Below is a table of video formats that I've been able to add subtitles to using Linux. For the most part, VLC and MPlayer will be used to encode the videos in examples in the following sections. Examples for VLC will be given for the Graphical User Interface (GUI) and the Command Line Interface (CLI), while Mplayer will only use the CLI. I've only been able to get VLC and Mplayer to hardcode subtitles. FFmpeg2theora, DVDauthor and MKVmerge however allow you to softcode the subtitles; whereby, the DVDs created by DVDauthor offer the only widely adopted format. I've only been able to softcode ASS subtitles using MKVmerge. Follow the links in the table to get to the examples of hardcoded and softcoded subtitles.
| Codec | VLC GUI | VLC CLI | MPLAYER | ffmpeg2theora | DVDauthor | Mkvmerge |
|---|---|---|---|---|---|---|
| Theora | Hard | Hard | Soft | |||
| DVD | Hard | Soft | ||||
| DV | Hard | |||||
| MPEG2 | Hard | Hard | Hard | |||
| MPEG4 | Hard | Hard | Hard | |||
| x264 | Hard | |||||
| Xvid | Hard | |||||
| Flash | Hard | |||||
| Matroska | Soft |
Since we're already using Linux, why not go all the way and use Theora? It's open-source and patent-free. As far as Internet streaming goes, it is becoming more and more accepted. All of the other formats have patent issues, which might come back to haunt you.
While Blurays are up-and-coming, DVDs are still the most widely used way to bring movies to the consumer's home. Thankfully, Linux can both hard and softcode create DVD-compatible videos; whereby, softcoded subtitles are much more prevalent. You can create full-feature DVDs with menus, multiple audio track, bonus material and more. I'll only show how to create a barebones DVD as DVD authoring is a book on its own.
The DV, DVCAM and DVCPRO formats are still widely excepted at film festivals. It is a nearly lossless format with a very high bitrate; however, its low resolution will eventually make it obsolete in face of HD.
If you want compatibility, MPEG2 is probably the most widely used of the above. It is rather old though and thus is very resource hungry.
Mplayer and VLC both make MPEG4 compliant files using FFmpeg libraries. The resulting films are very streamlined and widely compatible.
x264 is H264's – the up-and-coming star of the codec world -- open-source sister. It offers the best picture using the least space. This codec is MPEG4 compatible. It is widely used for Internet streaming.
Xvid is the open-source version of DivX. While not quite as good as x264, it is probably more widely compatible because it has been around longer. It is also MPEG4 compatible, albeit an earlier version. It is also widely used on the web.
The Flash video format is a vestige of the days when Flash players only supported this format. Thankfully nowadays, Flash accepts most codec from the MPEG4 family. I wouldn't use this format; however, I've included examples because it is sometimes requested.
Matroska isn't a codec, it is a "container format" which lets pack audio, video and subtitles into one file. You can use most codecs with it. Checkout Wikipedia for a list of which video players support this format. The support will also depend on whether the player supports the contained codec. Matroska isn't widely used.
VLC
VLC can transcode into more formats than described here. VLC Version 1.1.3 was used for these examples. With VLC you can either transcode using a GUI or on the commandline (CLI). While the GUI is more practical, the CLI offers options not available in the GUI. We'll start with the GUI. I have as yet only been able to hardcode subtitles with VLC.
GUI MPEG4
We'll start with an example of hardcoding subtitles onto a MPEG4 film. Afterward I'll delve into the details for other formats.
Open VLC and then go to
Media > Convert / Save
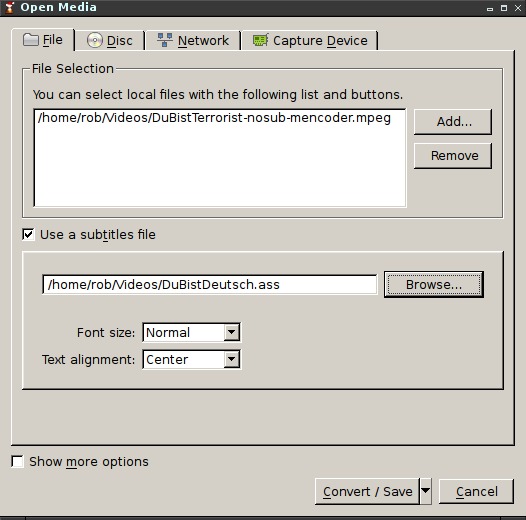
Under File Selection click Add and choose video file.
Check Use subtitle file. Click Browse to select your subtitle
file.
Click Convert / Save
Enter a name for your output file in the Destination file field. The
file name needs the proper extension for your encapsulation format and
codec, which will be MPEG-TS and MPEG4 respectively --
i.e. your_filename.mpg. I use MPEG-TS, but you can also pick another
encapsulation format for MPEG4. Check in VLC's chart
which encapsulation formats are compatible with which codecs.
Under Settings, select the Video - H264 + AAC (MP4) in the
Profile field. We'll adjust this profile instead of making our own
because of a bug.
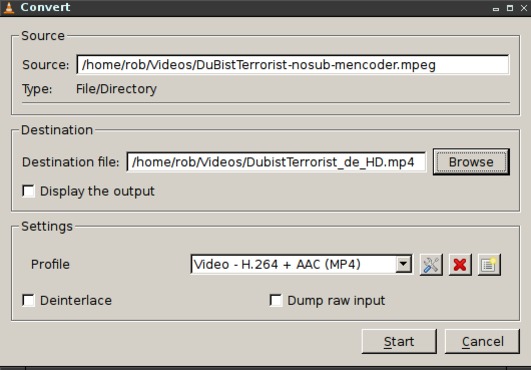
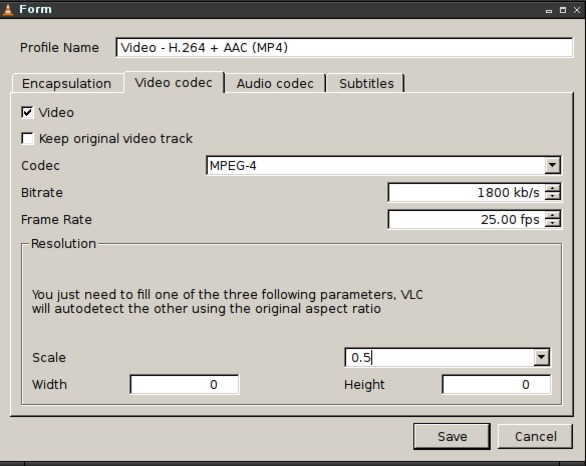
By clicking on the tool button next to the profile you can tune the settings.
Under the Encapsulation tab, the proper format should be chosen, in
this case MPEG-TS.
Under the Video codec tab MPEG-4 can be chosen from the Codec
drop-down menu (alternatively, you can try H-264; watch out though,
there's a bug in older versions of ubuntu). You can change the
Bitrate setting: Depends on the bitrate and resolution of your
source file, and can be anywhere from 500 kb/s for a small web-clip to
20000 kb/s for HDV. The framerate should be the same as your original
file: 25 fps for PAL and 29.97 for NTSC. You can also shrink the file
in the Resolution section if you're using it for the web and have to
save bandwidth. For example, set Scale to 0.5. Beware that at a
certain size the subtitles will become unreadable.
You can chose MPEG Audio as your Codec in the Audio codec tab, a
bitrate of 128 kb/s suffices, use 2 channels for stereo and a
samplerate of 44100 is good.
In the Subtitles tab make sure that Subtitles box is checked and that
the Overlay subtitles on the video box is checked. Beware: The field
should be blank. If you had created your own profile this wouldn't
have been possible, which I think is a bug.
Click Save in the Form window and Start in the Convert window.
GUI MPEG2
I will only describe the settings which are different than in the GUI MPEG4 section. Refer to that section for all other settings.
In the Destination file field enter a file name with the proper
extension for your encapsulation format, MPEG-TS --
i.e. your_filename.mpg.
Under the Encapsulation tab the proper format, MPEG-TS, should be
chosen.
Under the Video codec tab pick MPEG-2 in the Codec field. A
Bitrate of 4000 kb/s is good, 8000 is great. Once again, this depends
on your source file.
Under the Audio codec tab choose MPEG-Audio.
GUI Theora
I will only describe the settings which are different than in the GUI MPEG4 section. Refer to that section for all other settings.
In the Destination file field enter a file name with the proper
extension for your encapsulation format, OGV --
i.e. your_filename.ogv.
Under the Encapsulation tab the proper format, Ogg/Ogm, should be chosen.
Under the Video codec tab pick Theora in the Codec field. A
Bitrate of 1500 kb/s is good, 3000 is great. Once again, this depends
on your source file.
Under the Audio codec tab choose Vorbis.
CLI MPEG4
Here a MPEG4 is created on the commandline with hardcoded subtitles.
vlc -vvv -I dummy "source-movie.mpg" --sub-file=subtitle-file.ass \
:sout='#transcode{vcodec=mp4v,acodec=mp4a,audio-sync,soverlay,ab=128,vb=4000}:std{access=file,mux=mp4,dst="output-file.mp4"}' \
--freetype-color=16711935 vlc://quit
- -vvv
- Gives you a lot of information in the shell in case of a problem.
- -I dummy
- Prevents the GUI from opening
- –sub-file=
- Fill in your subtitle filename here
- :sout
- Output options
- vcodec=
- The video codec you will use. See here for the abbreviations for other codecs.
- acodec=
- The audio codec you will use. See here for the abbreviations for other codecs.
- audio-sync
- Syncs audio
- soverlay
- Hardcodes subtitles
- std
- Standard options
- access=file
- Means that the file will be written to a file
- mux=
- The encapsulation format you will use. See here for the abbreviations for other encapsulation formats.
- dst=
- The name of the destination file
- vlc://quit
- Quits vlc after completion
- ab=
- Sets the bitrate of your audio. Isn't strictly necessary as there are defaults, but can be set if you're not satisfied with the audio quality.
- vb=
- Same as above, but for video. You'll probably have to change this to get a good picture.
- –freetype-color=16711935
- Will create gaudy pink subtitles. See commandline help in the VLC wiki for more "Freetype2 font renderer" options which effect the look of subtitles. This only worked on SRT subtitles for me.
For more options see the vlc wiki.
CLI Theora
Here's an example for Theora file with more advanced options. See the CLI MPEG4 section for explanations of the other options.
vlc -vvv -I dummy "source-movie.mpg" --sub-file=subtitle-file.ass \
:sout='#transcode{vcodec=theo,acodec=vorb,audio-sync,aenc=vorbis{quality=10},venc=theora{quality=10},soverlay,scale=0.5}:std{access=file,mux=ogg,dst="target-file.ogm"}' \
vlc://quit
CLI MPEG2
See the CLI MPEG4 section for explanations of the options.
vlc -vvv -I dummy "source-movie.mpg" --sub-file=subtitle-file.ass \
:sout='#transcode{vcodec=mp2v,acodec=mpga,ab=128,vb=5000,audio-sync,soverlay}:std{access=file,mux=ts,dst="target-movie.mpg"}' vlc://quit
Mencoder
Although Mencoder (aka Mplayer) can play a variety of formats, ASS is only available over a trick at the moment. Italics for the SRT are only available over the same trick. Plain SRT isn't a problem. We'll start with an example using ASS and the rest will involve SRT. You can also encode to the other formats using ASS by pasting the ASS specific options into the commandline.
MPEG4 with ASS subtitles
This is a more complex example. We will also be using 2-pass encoding. If you are creating a video for commercial release, you should always use two-pass encoding as this will guarantee the best possible picture. For perfectionists there is also 3-pass encoding. We also employ the trick here to get ASS subtitles working. Use this for italics in SRT subtitles as well.
mencoder source-movie.mov -o /dev/null -sub subtitle-file.ass \
-ovc lavc -lavcopts vcodec=mpeg4:vpass=1 -nosound \
-ass -vf fixpts=fps=25,ass,fixpts
mencoder source-movie.mov -o output-movie.avi -sub subtitle-file.ass \
-ovc lavc -lavcopts vcodec=mpeg4:mbd=2:trell:vpass=2 -oac mp3lame -lameopts vbr=3 \
-ass -vf fixpts=fps=25,ass,fixpts
- -o /dev/null
- In the first pass we don't need an output file, so we output into oblivion
- vpass=1
- Tells Mencoder that this will be the first of two passes
- -oac
- Selects audio encoder
- -lameopts
- Options for the mp3lame audio encoder
- vbr=3
- Variable bitrate method
- -sub
- Subtitle file
- -ass
- Tells mencoder that ASS subtitles are being used. If you are using plain SRT subs, leave this out.
- -vf
- Different video filters separated by commas
- fixpts=fps=25,ass,fixpts
- Trick to get ASS support in mencoder. If you are using plain SRT subs, leave this out.
- -ovc
- Selects the video encoder
- -lavcopts
- Options for the lavc video encoder. Various options are separated by colons. See the mplayer documentation for details.
- mbd=
- tells the video encoder to use a macroblock mode that improves file quality and size
- trell
- tells the video encoder to use "trellis searched quantization" which make your picture pretty ;-)
- vcodec=
- Video codec
We are only scratching the surface of what mencoder can do. See the OSD/SUBTITLE OPTIONS section of the mplayer man page for more subtitle options, such as placement.
MPEG2
Here is a simple example with SRT subtitles which are hardcoded on a film.
mencoder source-movie.mov -o output-film.mpeg -oac lavc -ovc lavc \
-lavcopts acodec=ac3:vcodec=mpeg2video -of mpeg -sub subtitle-file.srt
- acodec=
- As the audio and video encoder are the same this time, the audio codec must also be selected. Here its ac3
- -of
- Output container format
Visit for a detailed explanation of the mencoder documentation options. See the MPEG4 with ASS subtitles section for explanations of the other options.
H264
Here's a very basic transcode to the x264 format, once again using 2-pass.
mencoder source-movie.mov -sub subtitle-file.srt -ovc x264 -x264encopts pass=1:bitrate=2000 \
-of avi -nosound -o /dev/null
mencoder source-movie.mov -sub subtitle-file.srt -ovc x264 -x264encopts pass=2:bitrate=2000 \
-of avi -oac mp3lame -lameopts vbr=3 -o output-file.avi
- -x264encopts
- colon separated options to send the x264 video encoder, see the mencoder documentation for more
- pass=
- use multiple passes
- bitrate=
- an average bitrate has to be given for 2-pass encoding to work
Actually mencoder's FAAC should be used for the output audio encoder, but I keep getting strange beeping sounds.
See the MPEG2 and MPEG4 with ASS subtitles sections for explanations of the other options.
Xvid
See the MPEG2 and MPEG4 with ASS subtitles sections for explanations of the options.
mencoder source-movie.mov -o /dev/null -sub subtitle-file.srt -nosound -of avi \
-ovc xvid -xvidencopts pass=1:chroma_opt:vhq=4:bvhq=1:quant_type=mpeg:bitrate=1000
mencoder source-movie.mov -o output-movie.avi -sub subtitle-file.srt -oac mp3lame -of avi \
-ovc xvid -xvidencopts pass=2:chroma_opt:vhq=4:bvhq=1:quant_type=mpeg:bitrate=1000
- -xvidencopts
- colon separated options to fine tune the video encoding. The additional options here are the ones suggested in the mencoder documentation for creating very high quality video.
Flash Untested
Here we create a small file for use with older flash players. There are several new settings within the lavcopts options, which can also be found in other muxers. See the MPEG2 and MPEG4 with ASS subtitles sections for explanations of the other options. I've marked this as untested as I took it from an example in the Mencoder documentation and haven't actually tried playing it with a Flash player.
mencoder source-movie.mov -sub subtitle-file.srt -o output-movie.flv \
-of lavf -oac mp3lame -lameopts abr:br=128 -srate 22050 -ovc lavc \
-lavcopts vcodec=flv:vbitrate=500:mbd=2:mv0:trell:v4mv:cbp:last_pred=3
- vbitrate=
- tells the video encoder which bitrate to use.
- -srate
- specifies a low output samplerate of the audio, which will also save space.
- br=
- tells the audio encoder which bitrate to use
- abr
- tells the audio encoder to use an average bitrate
- mbd=2:mv0:trell:v4mv:cbp:last_pred=3
- these options all try to make up for the very low bitrate
DVD compliant video
DVDs only allow for certain aspect ratios and resolutions, so you might have to scale your film. Look at this table in the mencoder documentation to see if you have to resize. You may also have to change your samplerate of your audio if it isn't already 48 kHz. Your source film might also be interlaced, in which case you should read this section and the one following it in the mencoder documentation. The following information is for PAL, see the above links for information relating to NTSC.
As ASS subtitles lose all their style information when softcoded on DVDs, this is the only way to get subtitle effects on DVDs that I know of using Linux. For this reason I will use ASS subtitles in this example.
Mencoder is pretty picky when it comes to making DVD compliant files. A lot of options have to be included. See the MPEG2 and MPEG4 with ASS subtitles sections for explanations of the options.
mencoder source-movie.mov -sub subtitle-file.ass -o target-movie.mpeg \
-oac lavc -ovc lavc -of mpeg -mpegopts format=dvd:tsaf \
-lavcopts acodec=ac3:vcodec=mpeg2video:vrc_buf_size=1835:vrc_maxrate=9500:vbitrate=8000:keyint=15:vstrict=0 \
-vf fixpts=fps=25,ass,fixpts,harddup -ass
- -mpegopts
- colon separated options to pass to the mpeg encapsulation format
- format=DVD
- Tells encapsulation format that this will be a DVD
- tsaf
- sets DVD compliant timestamps
- vrc_buf_size=1835
- buffer size in kbit, should be kept as is for DVD
- vrc_maxrate=9500
- maximum bitrate, any higher and you risk errors
- vbitrate=
- average bitrate, decrease if you have a lot of footage, increase if you have little
- keyint=
- 18 for 30fps material (NTSC), or 15 for 25/24 fps material (PAL)
- vstrict=0
- without this option a stream is created that cannot be decoded by some standalone DVD players.
- harddup
- make sure audio and video remain sync
DVD also accept 16/9 material, in which case you have add some options for the subtitles.
mencoder source-movie.mov -sub subtitle-file.ass -o target-movie.mpeg \
-oac lavc -ovc lavc -of mpeg -mpegopts format=dvd:tsaf \
-lavcopts acodec=ac3:vcodec=mpeg2video:vrc_buf_size=1835:vrc_maxrate=9500:vbitrate=8000:keyint=15:vstrict=0:aspect=16/9 \
-vf fixpts=fps=25,ass,fixpts,scale=720:576,harddup -ass
-ass-force-style ScaleX=0.75
- aspect=16/9
- tells the codec encoder that the movie has an aspect of 16/9.
- scale=720:576
- adds a rescaler to your video filter (regardless of the aspect, the film will be encoded in 4:3, it will later be stretched by the player based on the aspect information)
- -ass-force-style ScaleX=0.85
- makes sure the subtitles don't look squished.
If you are using SRT subtitles with or without italics and your aspect ratio is 16/9, keep everything as is (i.e. the ASS settings) and replace only the last line with the following:
-ass-font-scale 1.4 -ass-force-style ScaleX=0.75,MarginV=15
There are additional option with which you can fine tune audio and video encoding. See mencoder man page and mencoder documentation.
You can now author your dvd.
DV Untested
Exporting the video to your DV camera is as simple as hooking it up to your firewire interface, playing the video in full-screen mode and pressing record on your camera. I haven't done it in ages though, so I've marked this as untested. Use the following commandline to create your DV video.
mencoder source-movie.mov -o target-movie.dv -sub subtitle-file.srt \
-oac pcm -ovc lavc -of lavf -lavcopts vcodec=dvvideo -lavfopts format=dv
- -lavfopts format=dv
- tells the encapsulation format that we are creating dv video.
See the MPEG2 and MPEG4 with ASS subtitles sections for explanations of the options.
You may also have to change your samplerate of your audio if it isn't
already 48 kHz. Bear in mind that DV has to have either PAL (720x576)
or NTSC (720x480) resolution, so you might have to add a video filter
to scale your film (add -vf scale=720:576 for example) I haven't
figured out how to deal with 16/9. If your source material is
interlaced, you will want to keep it that way. Proceed as described in
the encoding interlaced video section of the mencoder instructions.
In addition, mencoder can encode videos compatible with the DVCPRO
formats. I've only been able to get it going with the additional ASS
options. Add -ass-font-scale 1.4 if you are using SRT
- DVCPRO50
mencoder source-movie.mov -o target-movie.dv -sub subtitle-file.ass -noskip -mc 0 \
-oac pcm -ovc lavc -lavcopts vcodec=dvvideo:format=422P -of lavf -lavfopts format=dv \
-vf fixpts=fps=25,ass,fixpts,harddup -ass
- DVCPRO25
mencoder source-movie.mov -o target-movie.dv -sub subtitle-file.ass -noskip -mc 0 \
-oac pcm -ovc lavc -lavcopts vcodec=dvvideo:format=411P -of lavf -lavfopts format=dv \
-vf fixpts=fps=25,ass,fixpts,harddup -ass
DVD encoding
Encoding a DVD is a three step process. First DVD compatible video and audio must be created. Then subtitles must be attached to the video in what is called multiplexing. Finally, the DVD file structure must be created in the authoring stage.
Creating DVD video
While DVDauthor excepts ASS subtitles, it will ignore your styles. If styles are important for you, you will have to create hardcode a DVD compliant video and skip to authoring.
First you have to create a DVD compliant version of your film, if it is not already DVD compliant. FFMPEG, is your best option.
ffmpeg -i source-movie.mov -target pal-dvd ffmpeg-dvd.mpg
Change pal-dv to ntsc-dvd for NTSC. If your aspect ratio ist 16:9 add the option -aspect 16:9.
We can also fall back on Mplayer, as in our example (to which you should refer for details) earlier, but without the subtitle options.
mencoder source-movie.mov -o target-movie.mpeg -oac lavc -ovc lavc -of mpeg -mpegopts format=dvd:tsaf \
-lavcopts acodec=ac3:vcodec=mpeg2video:vrc_buf_size=1835:vrc_maxrate=9500:vbitrate=5000:keyint=15:vstrict=0 \
Multiplexing
Adding a stream to an MPEG2 file is called multiplexing. We'll use spumux, which is part of the DVDauthor package, to multiplex the subtitles. The newest version of dvdauthor (0.7.0) allows for additional features, such as picking a subtitle color and the size of shadows. I recommend installing this by source if it isn't available yet in your distribution.
Spumux has various options which can be specified in an xml file:
<subpictures format="pal">
<stream>
<textsub
filename="subtitle-file.srt" characterset="utf-8"
fontsize="25.0" font="FreeSans" horizontal-alignment="center"
right-margin="60" top-margin="20" bottom-margin="37" subtitle-fps="25"
movie-fps="25" movie-width="720" movie-height="574" force="yes" />
</stream>
</subpictures>
See the spumux man page for an explanation of the above options. If you have captions in the film, you might want to play with the various margin settings and use only one-lined subtitles around the captions so that the subtitles don't cover them.
With the following command, the subtitles will be added to the movie if you named your xml file english.xml.
spumux -s1 english.xml < movie-pal.mpeg > movie-pal-en.mpeg
- -s
- represents the subtitle stream
- movie-pal.mpeg
- represents the input movie
- movie-pal-en.mpeg
- represents the output movie with subtitles
If you have multiple subtitles you would proceed as follows:
spumux -s2 german.xml < movie-pal-en.mpeg > movie-pal-en-de.mpeg
Add a second stream, use a second xml file which points to your – in this case – German subtitles, and add them to the mpeg file you created in the previous command.
Authoring
There are many programs to create DVDs available for Linux. Some will take care of the entire process of adding subtitles to video material for you. Those pre-packaged for Debian include:
Devede, Videotrans, QDVDAuthor, DVDwizard, dvdstyler, bombono-dvd and 2mandvd.
What they all have in common is that they depend on dvdauthor. So, it's a good idea to know your way around dvdauthor if you are going to be using these programs. For the time being, I'm only going to explain a basic dvdauthor setup, without a menu. Creating menus on the commandline is very complicated, especially because dvdauthor is very picky about the images you use.
Here is a basic DVD with one movie, which will start playing when you insert it into the dvd-player, and one subtitle stream.
First create an xml file with the following content:
<dvdauthor>
    <vmgm />
    <titleset>
        <titles>
          <video format="pal" />
          <subpicture lang="en" />
            <pgc>
                <vob file="ffmpeg-dvd-en.mpg" />
            </pgc>
        </titles>
    </titleset>
</dvdauthor>
Once again, I'll refer you to the man page for details.
Save it as, let's say, dvdauthor.xml
With the following command you create the DVD file system in the said output folder.
dvdauthor -x dvdauthor.xml -o output-dvd
You can test it using XINE and the following command.
xine dvd://home/user-name/output-dvd/
Be sure to enter the complete path to the DVD folder.
Or use VLC:
Media > Open Disc and click Browse next to the Disc device field. Pick
out the newly created folder. Click play.
Theora
For the moment Ogg only accepts SRT subtitles without special formating. First you have to encode your subtitles in the Kate format.
kateenc -t srt -c SUB -l en -o subtitles.ogg subtitle-file.srt
- -t
- type of input format
- -c
- tags the stream as subtitle
- -l
- language code
- -o
- output file name
Then create a theora (video) and vorbis (audio) version of your video, if it isn't already in that format.
ffmpeg2theora -v 10 -a 10 source-movie.mov
- -a
- sets to the audio quality (1-10 where 10 is best)
- -v
- sets to the video quality (1-10 where 10 is best)
This will create the file source-movie.ogv
Next merge the subtitles and video into one file.
oggz merge -o oggzmerge-kateenc.ogv source-movie.ogv subtitles.ogg
The subtitle stream won't be shown automatically in VLC and has to be turned on.
Matroska
Takes most video formats and SRT or ASS subtitle formats and merges them to one file. No transcoding takes place, so your video will remain in the original format stuffed into the mkv file. Mkvmerge is the commandline tool for creating Matroska files. The Linux package containing mkvmerge is called mkvtoolnix. There is also a GUI called mkvmerge GUI in the package mkvtoolnix-gui. It is pretty self-explanatory.
Here's an example:
mkvmerge -o target-file-with-subtitles.mkv source-movie.mpeg subtitle-file.ass
License

Subtitling with Linux by Rob Homsi is licensed under a Creative Commons Attribution 3.0 Germany License.
Date: 2011-09-28 15:24:52 CEST
HTML generated by org-mode 7.3 in emacs 23